IIS Logging broken when traffic proxied Via F5 NLB

So you have a new F5 NLB, You have a new site hosted on IIS behind said F5…And now you have broken IIS Logging…

You may find that after deploying F5, any IIS logging will now reflect the internal IP of the F5 unit, and not the external address of the actual client. Why? When requests are passed through proxies/load balancers, the client no longer has a direct connection to the web-server itself, all traffic is proxied by the F5-Unit and the traffic looks like its coming from the last hop in the chain (F5)


X-Forwarded-For Diagram

So how do we get our logging back? Easy, it just requires two simple pre-requisites (and no downtime).


First is to insert an “X-Forwarded-For” header into each request to the web server. This header is a non-standardised header used for identifying the originating IP address of a client connecting to a web server via an HTTP proxy or load balancer.
To Insert X-Forwarded header:

  1. From your F5 Web console select Local Traffic > Select Profiles > Select Services
  2. Choose One of your custom HTTP profiles or select the default HTTP profile to edit all child profiles
  3. Scroll down the page and locate the “Insert X-Forwarded-For” property and enable it (you may need to select the custom check-box first depending on your profile type)
  4. Select update to apply changes

Next step is to install an ISAPI filter developed by F5 to amend IIS’s logging with the correct requester IP using the X-Forwarded for HTTP header Syntax {X-Forwarded-For: clientIP, Proxy1IP, Proxy2IP} (this filter is supported on both IIS6 & 7)
Download the ISAPI filter here: https://devcentral.f5.com/downloads/codeshare/F5XForwardedFor.zip


  1. Copy the F5XForwardedFor.dll file from the x86\Release or x64\Release directory (depending on your platform) into a target directory on your system.  Let’s say C:\ISAPIFilters.
  2. Ensure that the containing directory and the F5XForwardedFor.dll file have read permissions by the IIS process.  It’s easiest to just give full read access to everyone.
  3. Open the IIS Admin utility and navigate to the web server you would like to apply it to.
  4. For IIS6, Right click on your web server and select Properties.  Then select the “ISAPI Filters” tab.  From there click the “Add” button and enter “F5XForwardedFor” for the Name and the path to the file “c:\ISAPIFilters\F5XForwardedFor.dll” to the Executable field and click OK enough times to exit the property dialogs.  At this point the filter should be working for you.  You can go back into the property dialog to determine whether the filter is active or an error occurred.
  5. For II7, you’ll want to select your website and then double click on the “ISAPI Filters” icon that shows up in the Features View.  In the Actions Pane on the right select the “Add” link and enter “F5XForwardedFor” for the name and “C:\ISAPIFilters\F5XForwardedFor.dll” for the Executable.  Click OK and you are set to go.

If you’re that way inclined – there is also an IIS Module available if you think ISAPI filters are not for you (See: https://devcentral.f5.com/weblogs/Joe/archive/2009/12/23/x-forwarded-for-http-module-for-iis7-source-included.aspx)

Let me know if you have any questions 🙂

-Patrick

Unable to Open Lync CSCP from Lync Server

When deploying a Lync Server the other day I spent a good 15 mins (stupid me) trying to figure out why I couldn’t open the Lync CSCP control panel from the Lync Server – I kept getting:

HTTP Error 401.1 – Unauthorized

You do not have permission to view this directory or page using the credentials that you supplied.

I had defined an Admin URL when establishing my topology (and published it), plus I had set the appropriate DNS records within my domain to make the CSCP site resolve – still no Dice. I finally ended up trying from another server which had Silverlight installed… It worked!?!

So what was the cause?
Back in Win Server 2003 Sp1 (and subsequent versions of Windows) Microsoft introduced a loop-back security check. This feature prevents access to a web application using a fully qualified domain name (FQDN) if the attempt to access it takes place from a machine that hosts that application. The end result is a 401. 1 Access denied from the web server and a logon failure event in the Windows event log.

A work around for the issue if you really want to access the Lync CSCP from the Lync server itself (using anything other than https://localhost/cscp):

  1. Logon on to the Lync server with an account that is member of the local admins group
  2. Start “regedit”
  3. Navigate and expand the following reg key “HKEY_LOCAL_MACHINE\SYSTEM\CurrentControlSet\Services\LanmanServer\Parameters”
  4. Right-click Parameters, click New, and then click DWORD (32-bit) Value.
  5. In the Value name box, type DisableStrictNameChecking, and then press ENTER.
  6. Now navigate to “HKEY_LOCAL_MACHINE\SYSTEM\CurrentControlSet\Control\Lsa\MSV1_0”
  7. Right-click MSV1_0, point to New, and then click Multi-String Value.
  8. Type BackConnectionHostNames, and then press ENTER
  9. Right-click BackConnectionHostNames, and then click Modify.
  10. In the Value data box, type the host name (or the host names) for the sites that are on the local computer, and then click OK.
  11. Quit Registry Editor, and then restart your server

You should be good to go 🙂

For more reading + another possible (and less-secure) work around for a lab environment see KB896861

-Patrick

Manual WSUS Sync using Powershell

A quick blog post tonight:

When setting up WSUS, its common practice to trial updates internally  prior to deployment across an entire environment…

For a recent WSUS setup I completed we decided to leave auto update approval on for all Windows Critical & Security updates so they could be tested after release every Patch Tuesday. After Microsoft’s recent spate of Out-Of-Band updates we were finding that machines were being updated half way through a month due the limited update controls you have with WSUS… We could opt to manually sync updates or select the longest time between syncs of “check once every 24 hours”.

Using some cool tips from the Hey Scripting Guy Blog I’ve slapped together this script that now runs as a scheduled task to download updates once a month on Patch Tuesday.

This is an impractical approach to updating, critical updates should be applied as soon as possible, however forcing a manual WSUS update could come in handy for a select few:


$ErrorActionPreference = "SilentlyContinue"

# WSUS Connection Parameters:
[String]$updateServer = "WSUS.resdevops.com"
[Boolean]$useSecureConnection = $False
[Int32]$portNumber = 80

# Load .NET assembly
[void][reflection.assembly]::LoadWithPartialName("Microsoft.UpdateServices.Administration")

# Connect to WSUS Server
$Wsus = [Microsoft.UpdateServices.Administration.AdminProxy]::getUpdateServer($updateServer,$useSecureConnection,$portNumber)

# Perform Synchronization
$Subscription = $Wsus.GetSubscription()
$Subscription.StartSynchronization()

Write-host “WSUS Sync Started/Queued; Check WSUS console or Event log for any Errors.”;

-Patrick

Remote logoff all Windows users with Powershell

An annoyance for anyone when running a large scripted software release is when the deployment fails half way through because someone has left a logged-on Windows session with an Open file or Window. You may then need to invest large amounts of time identifying the cause, reverting changes that only deployed half-way and eventually re-run the release package…

In one of my earlier blog posts I explained how I would drop servers into maintenance mode when running a software deployment to prevent being spammed by Operations Manager Alerts… I targeted my specific environment in SCOM using a filter that would only add servers with a NetBIOS name starting with PROD or TEST.

I have quickly whipped up something similar to boot all users off of servers (log-off) prior to executing release package. The snippet below will grab all servers in the “Servers OU” on active directory and throw them into an array. It will then enumerate each server and use the Inbuilt “MSG” command (similar to NET SEND) to warn each user logged onto servers to save their work and log off (along with a countdown timer). Once the timer hits zero the Win32Shutdown() WMI method is run to Force log-off all users so the deployment can proceed

This script could easily be turned into a function that passed along a parameter for Prod/Test/Dev environments.

Enjoy…

#Load Active Directory Module
Import-Module ActiveDirectory;

[int]$timeleft = 5 #Countdown time until Logoff (Mins)
[System.Reflection.Assembly]::LoadWithPartialName("System.Diagnostics")
$countdowntimer = new-object system.diagnostics.stopwatch

#Establish prodservers array + Enumerate all servers with a name starting with "PROD" and add to array
[array] $prodservers= @()
Get-AdComputer -filter 'Name -like "PROD*"' -SearchBase "OU=Servers,DC=resdevops,DC=com" -Properties "Name" | foreach-object {
$prodservers += $_.Name
}

while($timeleft -gt 0)
 {
	$countdowntimer.start()
	foreach ($server in $prodservers) {msg * /SERVER:$server "A software deployment is scheduled for the PROD environment; Your remote session will be logged off automatically in $timeleft minutes, you should save your work."}
	while ($countdowntimer.elapsed.minutes -lt 1) {write-progress -activity "Elapsed Time" -status $countdowntimer.elapsed}
	$countdowntimer.reset()
	$timeleft--
 }

#Once countdown is complete - Run Win32Shutdown WMI method with the "4" value 
#to force loggof  all users
foreach ($server in $prodservers) 
{
	Write-Host "Logging all users off of $server"
	(gwmi win32_operatingsystem -ComputerName $server).Win32Shutdown(4)
}
Write-Host "`n`nSent Logoff command to $($prodservers.count) servers" -foregroundcolor Green;

-Patrick

Add Proxy Addresses via PowerShell to Office 365 Users

Its safe to say that one of the most useful features of Office 365 from an administrative point of view is Directory-Sync via Forefront Identity Manager (FIM).

When given the task to add a new email alias/address to all users, we can simply add to the existing Proxy Address attribute in Active directory programmatically through PowerShell (and sync it up to the cloud using FIM). The code snippit below will take the take each users first& last names plus the $proxydomain to add “smtp:[email protected]” to their AD user object if they reside in $usersOU.

If the “Coexistence-Configuration” PSSnapin exists on the running system a manual directory sync will be initiated.


#Args
[string]$proxydomain = "@resdevops.com"; #Proxy domain
[string]$usersOU = "OU=Staff_Accounts,DC=resdevops,DC=com"; #OU to apply changes
[string]$powersnapin = "Coexistence-Configuration"; #Directory Sync PS-Snapin name
[int]$count = 0 ;

Import-Module ActiveDirectory

	Get-ADUser -Filter "*" -SearchScope Subtree -SearchBase "$usersOU" -Properties ProxyAddresses, givenName, Surname | foreach-object { 

	Write-Host "Editing user: $_.SamAccountName"

		if ($_.Proxyaddresses -match $_.givenName+"."+$_.Surname+$proxydomain)
		{
			Write-Host "Result: Proxy Address already exists; No action taken."
		}
		else
		{
 			Set-ADUser -Identity $_.SamAccountName -Add @{Proxyaddresses="smtp:"+$_.givenName+"."+$_.Surname+$proxydomain}
			Write-Host "Result: Added proxy address to Account"
			$count++
		}
	}
	#Execute Office 365 Directory Sync if possible
	$CheckSnapin = Get-PSSnapin -Registered $powersnapin -EA SilentlyContinue
	if ($CheckSnapin)
		{
			Add-PSSnapin Coexistence-Configuration;
			Start-OnlineCoexistenceSync
			Write-Host "`n `n ******Added proxy address with DirSync******"
		}
		else 
		{
			Write-Host "`n `n ******Added Proxy address; Please initiate a Directory Sync Manually******"
		}
Write-Host "Sucessfully Edited" $count "users"

-Patrick

F5 Network Load Balancing using Route Domains

I’m pretty new to the F5 NLB scene, any network load balancing I had previously done had been through the inbuilt Windows Network Load balancing (WLB) Server role. Recently I was asked to deploy a F5 configuration to an already running production environment to handle SSL Termination, Caching and (of course) Load balancing on both web and app tiers.

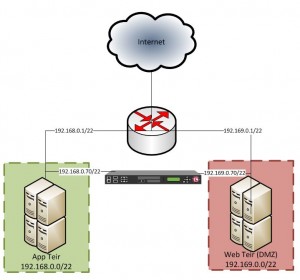
The existing deployment comprised of two /22 segments (Internal and DMZ networks) with a single router as the default gateway; Everything I read online told me to use a “One armed F5 Config”. This type of config “should” let me add a single physical network to one of my segments and reach both networks using a SNAT rule to adjust the origin address on the reply; But how could this work if a router was translating requests between the two networks? I discovered after many hours, it can’t…

My answer, ensure the F5 is connected to both network segments and use Route Domains to solve my routing problems. Here’s what I did:


  1. Utilize a free port on my F5 to connect into both networks – Most people could probably just add another VLAN to their existing network, however I don’t have the ability to control the managed network
  2. Establish the 2nd untagged VLAN for the 2nd connection in Step 1
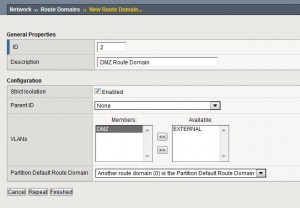
  3. Establish a new route domain from Network -> Route Domains -> Create.
      1. Enter a new description ID (I used 2 [to increment by 1 from the default Route domain used for my other External network])
      2. Give your route domain a description
      3. Enable Strict Isolation to enable cross-routing restrictions
      4. Add new VLAN as a member to Route domain
      5. Click Finished
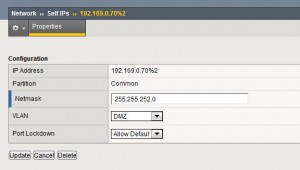
  4. Add a new Self-IP for the 2nd network connection on your new VLAN – Add %<routedomainID> after your IP


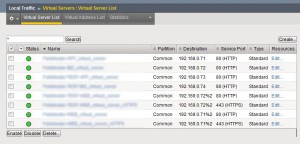
  5. Create a new Load balanced application/Virtual server and add %<routedomainID> to your VIP Address (NOTE: you will likely need to enable SNAT auto-map to the Virtual Server profile to allow return traffic via the Routedomain)
  6. You should “hopefully” be good to go – your application is now hopefully responding correctly and your health monitor is showing a friendly green status


This solution is merely a stop-gap until we can convert it into a routed configuration (recommended setup) – where the F5 unit will be the default gateway on both networks with something like a /29 stub network between the F5 and the router.

All in all, the F5 units are pretty blimmin powerful devices – I have a good handle on the UI but have only really scratched the surface using the BigPipe/TMSH commands. I KNOW that I’ve glossed over details, please feel free to leave a comment if you have any questions (it looks like there are many stuck Engineers on the net with the same problem)

-Patrick

SCOM Remote Powershell Maintenance Mode

I’m currently working a neat project with a nice automated deployment process – The Deployment (Powershell) does everything from configuring IIS to Updating SQL with Delta schema changes etc. One of the problems for the people in charge of Ops Manager (or those on-call for that matter) is that they will be spammed with Alert emails if the appropriate servers are not dropped into Maintenance mode when this deployment is run.

The team deploying the latest build don’t want mucking around with SCOM while trying to focus on a Prod release for exmple – What we do… Set appropriate servers to maintenance mode at the start of a deployment and pull them out once its complete. Here’s how we do it:

  1. Establish a new SCOM Group which our Maintenance Mode script will target when run.:
    Each server name in our environment is prefixed with its environment type e.g. PRODWEB1, TESTAPP2, PRODSQL1, etc. I’ve setup a Dynamic group with the following rule to target “PROD” machines (and another for test): ( Object is Windows Computer AND ( NetBIOS Computer Name Contains PROD ) AND True )
  2. Enable PowerShell remoting on SCOM server so we can utilize the OpsManager Powershell Cmdlets:
    Enable-PSRemoting -force
  3. Add the appropriate Powershell snippits (or add them as functions) to your deployment to enter and Exit Maintenance Mode:

To Enter Maintenance Mode:

enter-pssession -computername scomserver.resdevops.com
invoke-command -computername scom1.resdevops.com -scriptblock {

Import-Module OperationsManager
$Instance = Get-SCOMGroup -displayname "PRODSERVERROUPNAME" | Get-SCOMClassInstance
$Time = ((Get-Date).AddMinutes(30))
Start-SCOMMaintenanceMode -Instance $Instance -EndTime $Time -Reason "PlannedOther" -Comment "Code Deployment"

}
Exit-Pssession

Exit Maintenance Mode:

enter-pssession -computername scomserver.resdevops.com
invoke-command -computername scom1.resdevops.com -scriptblock {

import-module operationsmanager
$Instance = Get-SCOMGroup -displayname "PRODSERVERGROUPNAME" | Get-SCOMClassInstance
$MMEntry = Get-SCOMMaintenanceMode -Instance $Instance
$NewEndTime = (Get-Date)
Set-SCOMMaintenanceMode -MaintenanceModeEntry $MMEntry -EndTime $NewEndTime -Comment "Deployment Complete - Maintenance mode disabled"
}
Exit-Pssession

Let me know if you have any Questions.

-Patrick

Welcome to my Blog…

/// <summary>
///  First Generic Blog Post
/// </summary>

Hey,

Welcome to my blog – I hope to use this as a general Brain dump around topics I spend a bit of time with, or find otherwise undocumented anywhere else (Hopefully this content will be useful to others in the future).

Feel free to ask questions/post comments.

-Patrick