SCOM Win-RM Powershell – Hitting WSMan Memory Limits

scomposhWinRM can be a very useful tool (even if it is somewhat of a challenge to set-up [esp if you want to use CredSSP]. I am however finding it more and more useful to execute cmdlets for Powershell modules you cant easily install; An example is the Operations Manager 2012 cmdlets that are only installed with the Console.

For a maintance mode script we recently used (similar to this one) I found myself tripping over one of the following errors when attempting to remotely connect to my SCOM server and put a group into maintenance mode:


Processing data from remote server failed with the following error message: TheWSMan Providor host did not return a proper response. A Providor in the host process may have behaved improperly. For more information, see the about help _Remoting_troubleshooting help topic.

Or

Processing data for a remote command failed with the following error message: Deserialized objects exceed the memory quota. For more information, see
the about_Remote_Troubleshooting Help topic


These messages are nice and generic with no real hint to the cause. So why does it happen?

When attempting to run up the OperationsManager Module (and subsequantly connect to the SCOM SDK) to run cmdlets we will exhaust the 150MB defualt WSMan memory allocation. In order to continue we will need to exend the “MaxMemoryPerShellMb” allocation Run the following to view/alter these values:

#View Existing WSMan MaxMemory Value
Get-Item WSMan:\localhost\Shell\MaxMemoryPerShellMB

#Set new WSMan MaxMemory Value to 1 Gb
Set-Item WSMan:\localhost\Shell\MaxMemoryPerShellMB 1024 -Force

Easy 🙂

-Patrick


IIS Logging broken when traffic proxied Via F5 NLB

So you have a new F5 NLB, You have a new site hosted on IIS behind said F5…And now you have broken IIS Logging…

You may find that after deploying F5, any IIS logging will now reflect the internal IP of the F5 unit, and not the external address of the actual client. Why? When requests are passed through proxies/load balancers, the client no longer has a direct connection to the web-server itself, all traffic is proxied by the F5-Unit and the traffic looks like its coming from the last hop in the chain (F5)


X-Forwarded-For Diagram

So how do we get our logging back? Easy, it just requires two simple pre-requisites (and no downtime).


First is to insert an “X-Forwarded-For” header into each request to the web server. This header is a non-standardised header used for identifying the originating IP address of a client connecting to a web server via an HTTP proxy or load balancer.
To Insert X-Forwarded header:

  1. From your F5 Web console select Local Traffic > Select Profiles > Select Services
  2. Choose One of your custom HTTP profiles or select the default HTTP profile to edit all child profiles
  3. Scroll down the page and locate the “Insert X-Forwarded-For” property and enable it (you may need to select the custom check-box first depending on your profile type)
  4. Select update to apply changes

Next step is to install an ISAPI filter developed by F5 to amend IIS’s logging with the correct requester IP using the X-Forwarded for HTTP header Syntax {X-Forwarded-For: clientIP, Proxy1IP, Proxy2IP} (this filter is supported on both IIS6 & 7)
Download the ISAPI filter here: https://devcentral.f5.com/downloads/codeshare/F5XForwardedFor.zip


  1. Copy the F5XForwardedFor.dll file from the x86\Release or x64\Release directory (depending on your platform) into a target directory on your system.  Let’s say C:\ISAPIFilters.
  2. Ensure that the containing directory and the F5XForwardedFor.dll file have read permissions by the IIS process.  It’s easiest to just give full read access to everyone.
  3. Open the IIS Admin utility and navigate to the web server you would like to apply it to.
  4. For IIS6, Right click on your web server and select Properties.  Then select the “ISAPI Filters” tab.  From there click the “Add” button and enter “F5XForwardedFor” for the Name and the path to the file “c:\ISAPIFilters\F5XForwardedFor.dll” to the Executable field and click OK enough times to exit the property dialogs.  At this point the filter should be working for you.  You can go back into the property dialog to determine whether the filter is active or an error occurred.
  5. For II7, you’ll want to select your website and then double click on the “ISAPI Filters” icon that shows up in the Features View.  In the Actions Pane on the right select the “Add” link and enter “F5XForwardedFor” for the name and “C:\ISAPIFilters\F5XForwardedFor.dll” for the Executable.  Click OK and you are set to go.

If you’re that way inclined – there is also an IIS Module available if you think ISAPI filters are not for you (See: https://devcentral.f5.com/weblogs/Joe/archive/2009/12/23/x-forwarded-for-http-module-for-iis7-source-included.aspx)

Let me know if you have any questions 🙂

-Patrick

F5 Network Load Balancing using Route Domains

I’m pretty new to the F5 NLB scene, any network load balancing I had previously done had been through the inbuilt Windows Network Load balancing (WLB) Server role. Recently I was asked to deploy a F5 configuration to an already running production environment to handle SSL Termination, Caching and (of course) Load balancing on both web and app tiers.

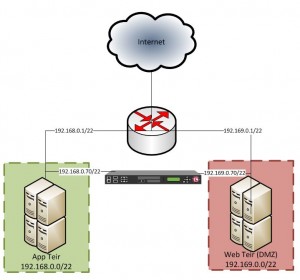
The existing deployment comprised of two /22 segments (Internal and DMZ networks) with a single router as the default gateway; Everything I read online told me to use a “One armed F5 Config”. This type of config “should” let me add a single physical network to one of my segments and reach both networks using a SNAT rule to adjust the origin address on the reply; But how could this work if a router was translating requests between the two networks? I discovered after many hours, it can’t…

My answer, ensure the F5 is connected to both network segments and use Route Domains to solve my routing problems. Here’s what I did:


  1. Utilize a free port on my F5 to connect into both networks – Most people could probably just add another VLAN to their existing network, however I don’t have the ability to control the managed network
  2. Establish the 2nd untagged VLAN for the 2nd connection in Step 1
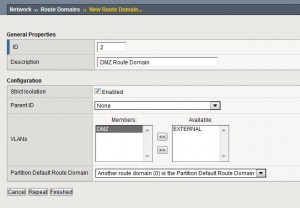
  3. Establish a new route domain from Network -> Route Domains -> Create.
      1. Enter a new description ID (I used 2 [to increment by 1 from the default Route domain used for my other External network])
      2. Give your route domain a description
      3. Enable Strict Isolation to enable cross-routing restrictions
      4. Add new VLAN as a member to Route domain
      5. Click Finished
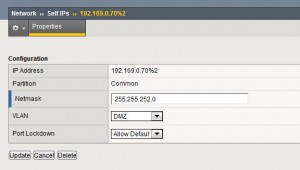
  4. Add a new Self-IP for the 2nd network connection on your new VLAN – Add %<routedomainID> after your IP


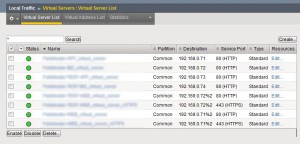
  5. Create a new Load balanced application/Virtual server and add %<routedomainID> to your VIP Address (NOTE: you will likely need to enable SNAT auto-map to the Virtual Server profile to allow return traffic via the Routedomain)
  6. You should “hopefully” be good to go – your application is now hopefully responding correctly and your health monitor is showing a friendly green status


This solution is merely a stop-gap until we can convert it into a routed configuration (recommended setup) – where the F5 unit will be the default gateway on both networks with something like a /29 stub network between the F5 and the router.

All in all, the F5 units are pretty blimmin powerful devices – I have a good handle on the UI but have only really scratched the surface using the BigPipe/TMSH commands. I KNOW that I’ve glossed over details, please feel free to leave a comment if you have any questions (it looks like there are many stuck Engineers on the net with the same problem)

-Patrick

Welcome to my Blog…

/// <summary>
///  First Generic Blog Post
/// </summary>

Hey,

Welcome to my blog – I hope to use this as a general Brain dump around topics I spend a bit of time with, or find otherwise undocumented anywhere else (Hopefully this content will be useful to others in the future).

Feel free to ask questions/post comments.

-Patrick